# Setting Up Prisma with MySQL: A Step-by-Step Guid
.env
```prisma
// This is your Prisma schema file,
// learn more about it in the docs: https://pris.ly/d/prisma-schema
// Looking for ways to speed up your queries, or scale easily with your serverless or edge functions?
// Try Prisma Accelerate: https://pris.ly/cli/accelerate-init
generator client {
provider = "prisma-client-js"
}
datasource db {
provider = "mysql"
url = env("DATABASE_URL")
}
model Device {
id Int @id @default(autoincrement())
name String
data Json
}
```
src\index.js
```javascript
import { PrismaClient } from "@prisma/client";
const prisma = new PrismaClient();
async function main() {
const device = await prisma.device.create({
data: {
name: "Alice",
data: { key: "value" }, // Example JSON data
},
});
console.log(device);
}
main()
.catch(async (e) => {
console.error(e);
process.exit(1);
})
.finally(async () => {
await prisma.$disconnect();
});
```
prisma\schema.prisma
```prisma
// This is your Prisma schema file,
// learn more about it in the docs: https://pris.ly/d/prisma-schema
// Looking for ways to speed up your queries, or scale easily with your serverless or edge functions?
// Try Prisma Accelerate: https://pris.ly/cli/accelerate-init
generator client {
provider = "prisma-client-js"
}
datasource db {
provider = "mysql"
url = env("DATABASE_URL")
}
model Device {
id Int @id @default(autoincrement())
name String
data Json
}
```
package.json
```json
{
"name": "graph",
"version": "1.0.0",
"main": "src/index.js",
"type": "module",
"scripts": {
"dev": "nodemon src/index.js"
},
"keywords": [],
"author": "",
"license": "ISC",
"description": "",
"dependencies": {
"@prisma/client": "^6.2.1",
"dotenv": "^16.4.7",
"express": "^4.21.2",
"express-graphql": "^0.12.0",
"fs": "^0.0.1-security",
"graphql": "^16.10.0",
"graphql-yoga": "^5.10.9",
"lodash": "^4.17.21",
"nodemon": "^3.1.9",
"path": "^0.12.7"
}
}
```
## Setting Up Prisma with MySQL: A Step-by-Step Guid
[](https://medium.com/@xuwei19850423?source=post_page---byline--6a2bd872b985--------------------------------)
[Craftsman](https://medium.com/@xuwei19850423?source=post_page---byline--6a2bd872b985--------------------------------)
·
Follow
3 min read·Feb 16, 2024
3
1. **Setting up Mysql**
Firstly, let’s install MySQL on Ubuntu by following the instructions provided in the following guide:
After installing MySQL and logging in with the root user, we can proceed to create a database and tables. Here are the commands:
```
mysql -u root -p
```
Enter your password when prompted.
Creating a database named `myFirstDatabase`:
```
CREATE DATABASE myFirstDatabase;
```
To see the list of databases and let’s use the `myFirstDatabase`:
```
show databases;
use myFirstDatabase;
```
Creating a table named `device` with columns `id`, `name`, and `data`:
```
CREATE TABLE device (
id INT AUTO_INCREMENT PRIMARY KEY,
name VARCHAR(255),
data JSON
);
show tables;
```
## 2 Create project setup
To start, create a project directory and navigate into it:
```
mkdir hello-prisma
cd hello-prisma
```
Next, initialize a TypeScript project and add the Prisma CLI as a development dependency:
```
npm init -y
npm install prisma typescript ts-node @types/node --save-dev
```
This sets up your `package.json` with the necessary dependencies for your TypeScript app.
Then, initialize TypeScript:
You can now invoke the Prisma CLI by prefixing it with `npx`:
```
npx prisma
```
Next, set up your Prisma project by creating your [Prisma schema](https://www.prisma.io/docs/orm/prisma-schema) file with the following command:
```
npx prisma init
```
This command does two things:
* creates a new directory called `prisma` that contains a file called `schema.prisma`, which contains the Prisma schema with your database connection variable and schema models
* creates the [`.env`](https://www.prisma.io/docs/orm/more/development-environment/environment-variables/env-files)[ file](https://www.prisma.io/docs/orm/more/development-environment/environment-variables/env-files) in the root directory of the project, which is used for defining environment variables (such as your database connection)
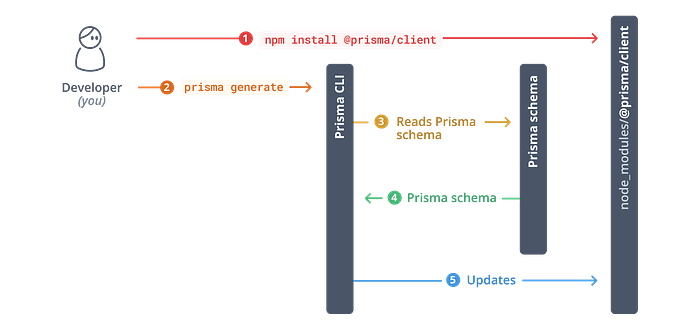
## 3. Install and generate Prisma Client
To get started with Prisma Client, you need to install the `@prisma/client` package:
```
npm install @prisma/client
```
## 4. Connect your database (Mysql)
To connect your database, update the `url` field of the `datasource` block in your Prisma schema (`prisma/schema.prisma`) to your database connection URL:
```
datasource db {
provider = "mysql"
url = env("DATABASE_URL")
}
generator client {
provider = "prisma-client-js"
}
model device {
id Int @id @default(autoincrement())
name String
data Json
}
```
Update your `.env` file (`vim .env`) with your MySQL database connection URL:
```
DATABASE_URL="mysql://helloai:123456@127.0.0.1:3306/myFirstDatabase"
```
## 5. Write your first query with Prisma Client
Now that you have generated Prisma Client, you can start writing queries to read and write data in your database. For this guide, let’s use a plain Node.js script (`index.ts`) to explore some basic features of Prisma Client:
```
import { PrismaClient } from '@prisma/client'
const prisma = new PrismaClient()
async function main() {
const device = await prisma.device.create({
data: {
name: 'Alice',
data: { key: 'value' } // Example JSON data
},
})
console.log(device)
}
main()
.catch(async (e) => {
console.error(e)
process.exit(1)
})
.finally(async () => {
await prisma.$disconnect()
})
```
Run `prisma generate` in your terminal to generate Prisma Client. This command reads your Prisma schema and generates Prisma Client based on it. Make sure you run this command in your project directory where your `schema.prisma` file is located:
```
npx prisma generate
```
To run the TypeScript script, use the following command:
```
npx ts-node index.ts
```
This command will execute the TypeScript file (`index.ts`) using `ts-node`.
Reference:\