😆Một bài mẫu để sử dụng html với typescript (ok)
Một thực tế là chưa tìm được cách xây dựng trực tiếp file js copile ra từ file tsx nhúng vào file html hoạt động được. Nhưng rất may qua tìm hiểu chúng ta có thể sử dụng webpack để làm được việc trên
Source
C:\Users\Administrator\Desktop\practice\package.json
{
  "name": "webpack-setup",
  "version": "1.0.0",
  "description": "",
  "main": "src/index.ts",
  "scripts": {
    "test": "echo \"Error: no test specified\" && exit 1",
    "start": "webpack-dev-server --mode development",
    "build": "webpack --mode production"
  },
  "keywords": [],
  "author": "",
  "license": "ISC",
  "devDependencies": {
    "css-loader": "^6.7.1",
    "html-webpack-plugin": "^5.5.0",
    "mini-css-extract-plugin": "^2.6.1",
    "ts-loader": "^9.5.0",
    "webpack": "^5.89.0",
    "webpack-cli": "^5.1.4",
    "webpack-dev-server": "^4.15.1"
  },
  "dependencies": {
    "typescript": "^5.2.2"
  }
}
C:\Users\Administrator\Desktop\practice\tsconfig.json
C:\Users\Administrator\Desktop\practice\webpack.config.js
C:\Users\Administrator\Desktop\practice\src\another-file.ts
C:\Users\Administrator\Desktop\practice\src\app.ts
C:\Users\Administrator\Desktop\practice\src\custom.html
C:\Users\Administrator\Desktop\practice\src\exportedFile.ts
C:\Users\Administrator\Desktop\practice\src\index.ts
C:\Users\Administrator\Desktop\practice\src\vector2.ts
C:\Users\Administrator\Desktop\practice\src\vector3.ts
Nó sinh ra file như này đây
C:\Users\Administrator\Desktop\practice\dist\index.html
C:\Users\Administrator\Desktop\practice\dist\bundle.js
Using webpack with TypeScript
Using webpack with TypeScript
September 1, 2022 8 min read

See how LogRocket's AI-powered error tracking works
no signup required
Check it out
Used in many modern projects, webpack is an amazing tool that optimizes application resources so that they work more efficiently and effectively on any device. webpack helps to compile and bundle modules into a single file, reducing HTTP requests and improving application performance as a result.
With webpack, TypeScript code is compiled into a JavaScript file that is browser-friendly. With webpack loaders, you can also convert SASS and LESS files into a single CSS bundle file.
In this article, we’ll learn how to use webpack to compile TypeScript to JavaScript, bundle source code into a single JavaScript file, and use a source map for debugging. We’ll also explore how to use webpack plugins.
To follow along with this tutorial, you’ll need the following:
npm
Node.js: If you already have Node.js installed, ensure it’s ≥v8.x.
Any code editor of your choice; I’ll use Visual Studio Code
Basic knowledge of TypeScript
Let’s get started!
Jump ahead:
webpack loaders
By default, webpack only understands JavaScript files, treating every imported file as a module. webpack cannot compile or bundle non-JavaScript files, therefore, it uses a loader.
Loaders tell webpack how to compile and bundle static assets. They are used for compiling TypeScript modules into JavaScript, handling application styles, and even linting your code with ESLint.
A few webpack loaders include ts-loader, css-loader, style-loader, and more; we’ll discuss them later in this tutorial.
Setting up webpack and TypeScript
Let’s start by setting up our project. First, you should have TypeScript installed on your computer. To install TypeScript globally, use the command below:
Installing TypeScript globally eliminates the need to install TypeScript each time you start a new project.
Next, we’ll install the webpack and ts-loader packages as dependencies in our project:
webpack configuration
By default, webpack does not need a configuration file. It will assume that the entry point for your project is src/index.js and will output the minified and optimized result in dist/main.js during production.
If you want to use plugins or loaders, then you’ll need to use the webpack configuration file, allowing you to specify how webpack will work with your project, which files to compile, and where the output bundle file will be.
Let’s add the webpack configuration file to our project. From the project root folder, create a webpack.config.js file with the following configurations:
Let’s review some of the webpack configuration options. For one, the entry option is the starting point for the application, where webpack begins to build a dependency graph. webpack will proceed to other modules based on the entry file.
 Over 200k developers use LogRocket to create better digital experiences
![]() Learn more →
Learn more →
The output option tells webpack where to save bundle files and allows you to name the bundle file. Finally, the module option tells webpack how to process modules with specific rules using loaders.
TypeScript configuration
The TypeScript configuration file controls how TypeScript will be compiled to JavaScript and specifies the various compiler options required for transpiling TypeScript.
From the project root folder, create the tsconfig.json file and add the following configurations:
The target option is the version of JavaScript you want to transpile TypeScript to, while module is the format of the import statement used. You can set the module to CommonJS, ES6, or UMD since webpack will handle all module systems.
Package configuration
Now, we need to add a webpack script that will run the webpack.config.js file for us.
To add the webpack script, open the package.json file and add the following scripts to the script option:
The package.json file will now contain the following configuration settings:
Now, let’s create a simple TypeScript program that will subtract two numbers. Inside the src folder, create an index.ts file and add the following TypeScript code:
Next, create another app.ts file and add the following code:
Running the develop script will start the app in development mode:
Running the build script will run the app in production mode:
After running the build command, webpack will transpile the two TypeScript files into JavaScript code and generate a bundle.js file inside the dist folder.
Creating HTML pages with HtmlWebpackPlugin
HtmlWebpackPluginThe HtmlWebpackPlugin allows webpack to generate a standard HTML page that will serve the generated bundle files.
When the filename of the bundle changes or is hashed, HTMLWebpackPlugin updates the filenames on the HTML page. First, to install HtmlWebpackPlugin, run the command below:
Next, we need to import and add HtmlWebpackPlugin to the webpack configuration plugin option as follows:
The template is a custom HTML file generated by HtmlWebpackPlugin to be injected into the HTML page. To create the custom HTML, inside the src folder, create a custom.html file and add the following HTML code:
You don’t have to include the script or link tags in the custom HTML; HtmlWebpackPlugin will take care of that by linking the bundle file URL with the generated page.
More great articles from LogRocket:
Don't miss a moment with The Replay, a curated newsletter from LogRocket
Learn how LogRocket's Galileo cuts through the noise to proactively resolve issues in your app
Use React's useEffect to optimize your application's performance
Switch between multiple versions of Node
Discover how to use the React children prop with TypeScript
Explore creating a custom mouse cursor with CSS
Advisory boards aren’t just for executives. Join LogRocket’s Content Advisory Board. You’ll help inform the type of content we create and get access to exclusive meetups, social accreditation, and swag.
Running the app in production mode will generate the index.html HTML page inside the dist folder.
Bundling CSS with MiniCSSExtractPlugin
MiniCSSExtractPlugincss-loader tells webpack how to work with the CSS module. It interprets @import and URL() as import/require() and resolves them. css-loader enables webpack to compile all CSS files and convert them into JavaScript format.
Bundling CSS files with style-loader makes HTML page styles unresponsive until the Bundle.js is completely loaded. The style-loader injects CSS into the DOM, but the bundled JavaScript file has to load completely before the styles are injected. To solve this, we can use MiniCssExtractPlugin.
The MiniCssExtractPlugin extracts CSS files and bundles them into a single bundle.css file. This is useful for reducing the size of your CSS assets and avoiding unnecessary HTTP requests to load them.
We can install css-loader and MiniCssExtractPlugin by running the commands below in the terminal:
Now, let’s add the css-loader and MiniCssExtractPlugin to the webpack.config.js file.
At the top of the webpack.config.js file, import the MiniCssExtractPlugin module using the code below:
Then, we’ll add a new rule to the rules property as follows:
When css-loader compiles all the CSS files into JavaScript, MiniCssExtractPlugin.loader loads the CSS into the CSS bundle file.
Next, we’ll add MiniCssExtractPlugin to the plugin option as follows:
Now that we’ve configured css-loader and MiniCssExtractPlugin, let’s create a CSS file and import it into index.ts. Inside the src folder, create an index.css file and add the following CSS code:
Inside index.ts, import the CSS style as follows:
Running npm run build will bundle the CSS and apply it to index.html. When you start the app in development mode and open http://localhost:4000 on the browser, it should look like the following image:

Minifying CSS
We can use the css-minimizer-webpack-plugin to reduce the size of CSS files by removing unused CSS rules and keeping only the necessary ones.
css-minimizer-webpack-plugin analyzes the compiled CSS file and finds any unused styles. This plugin will then remove these unused styles from your final CSS file, thereby reducing its size.
Run the installation command below to install css-minimizer-webpack-plugin:
Let’s add css-minimizer-webpack-plugin to the webpack configuration. First, import the plugin as follows:
Then, we’ll add a new optimization property to the webpack configuration as follows:
When we run the build command, bundle.css will be minified but bundle.js will not. The default bundle.js minimizer has been overridden with the minimizer option that we set. To solve this, we need to minify the JavaScript using TerserWebpackPlugin.
Minifying JavaScript
In the current version of webpack at the time of writing, v5.74.0 and later, you don’t have to install the TerserWebpackPlugin since it’s included out of the box. First, we have to import TerserWebpackPlugin:
Then, add TerserPlugin to the minimizer option as follows:
If you run the build script and look at the bundle files in the dist folder, you’ll see that both JavaScript and CSS are minified.
Using Copywebpackplugin
CopywebpackpluginWe can configure webpack to copy application assets from the development folder into the build folder dist using CopyWebpackPlugin. This plugin can copy files like images, videos, and other assets into the dist folder.
Install CopyWebpackPlugin using the command below:
Now, let’s add CopyWebpackPlugin to the webpack configuration. Import the plugin as follows:
Next, we’ll add CopyWebpackPlugin to the plugin option. The from property is the folder that we’ll copy from, and the to property is the folder in dist directory to copy all files to:
Create a new img folder and add images in it. Once the build command is run, the images will be copied to dist/img.
Debugging with a source map
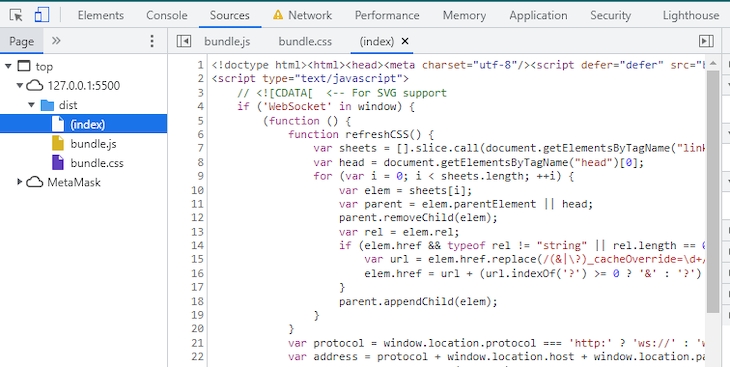
When we build to the bundle by compiling TypeScript files into JavaScript files, we might need to debug and test the bundle file using our browser’s DevTool.
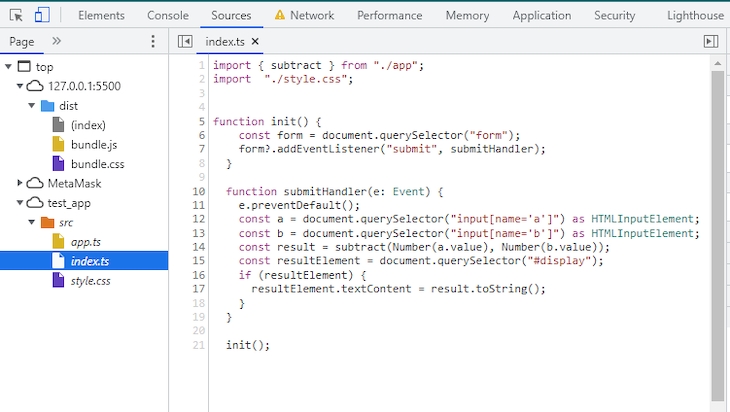
When you’re debugging your code on a browser’s DevTool, you’ll notice that only the bundle files appear. Whenever there is an error in our TypeScript code, it’ll only be indicated in the bundle file, making it hard to trace errors back to TypeScript for correction. However, with a source map, we can easily debug TypeScript using our DevTool:

Source maps display the original source file, making it easy for us to debug TypeScript and fix bundles and minified JavaScript code.
Source map .map files contain details of both the original source files and the bundle files. DevTools uses this file to map the original source file with the bundle file.
To generate .map files for the bundle files, we need to configure both webpack and TypeScript. In the TypeScript configuration file, add sourceMap to the compiler option and set its value to true:
Next, we’ll add the devtool property to the webpack configuration and set it to true, telling webpack to generate an appropriate source map for each bundle file:
When you run the build command, you’ll be able to debug the original source code directly:

Conclusion
As TypeScript’s popularity continues to grow, webpack has become an important option for developers looking to optimize their projects. With webpack plugins, we can optimize TypeScript application resources.
In this tutorial, we walked through the step-by-step process of setting up webpack with TypeScript. We also learned how to optimize TypeScript applications using webpack plugins, and we explored debugging our TypeScript code with a source map.
LogRocket: Full visibility into your web and mobile apps
LogRocket is a frontend application monitoring solution that lets you replay problems as if they happened in your own browser. Instead of guessing why errors happen, or asking users for screenshots and log dumps, LogRocket lets you replay the session to quickly understand what went wrong. It works perfectly with any app, regardless of framework, and has plugins to log additional context from Redux, Vuex, and @ngrx/store.
In addition to logging Redux actions and state, LogRocket records console logs, JavaScript errors, stacktraces, network requests/responses with headers + bodies, browser metadata, and custom logs. It also instruments the DOM to record the HTML and CSS on the page, recreating pixel-perfect videos of even the most complex single-page and mobile apps.
Last updated
Was this helpful?
